When a place has more than one way in
Two parking lots or gates? Name each way in and give it its own first photos.
Most guides need one route: you photograph the walk from the street to the door and you are done. But some places have two ways in (a north lot and a south gate, say) and the first part of the walk is genuinely different depending on where the visitor parked.
How it works
A guide can have up to four named ways in (four start points in all, counting parking spots). Each one gets its own opening photos; everything after that is shared, so you only photograph the common part once.
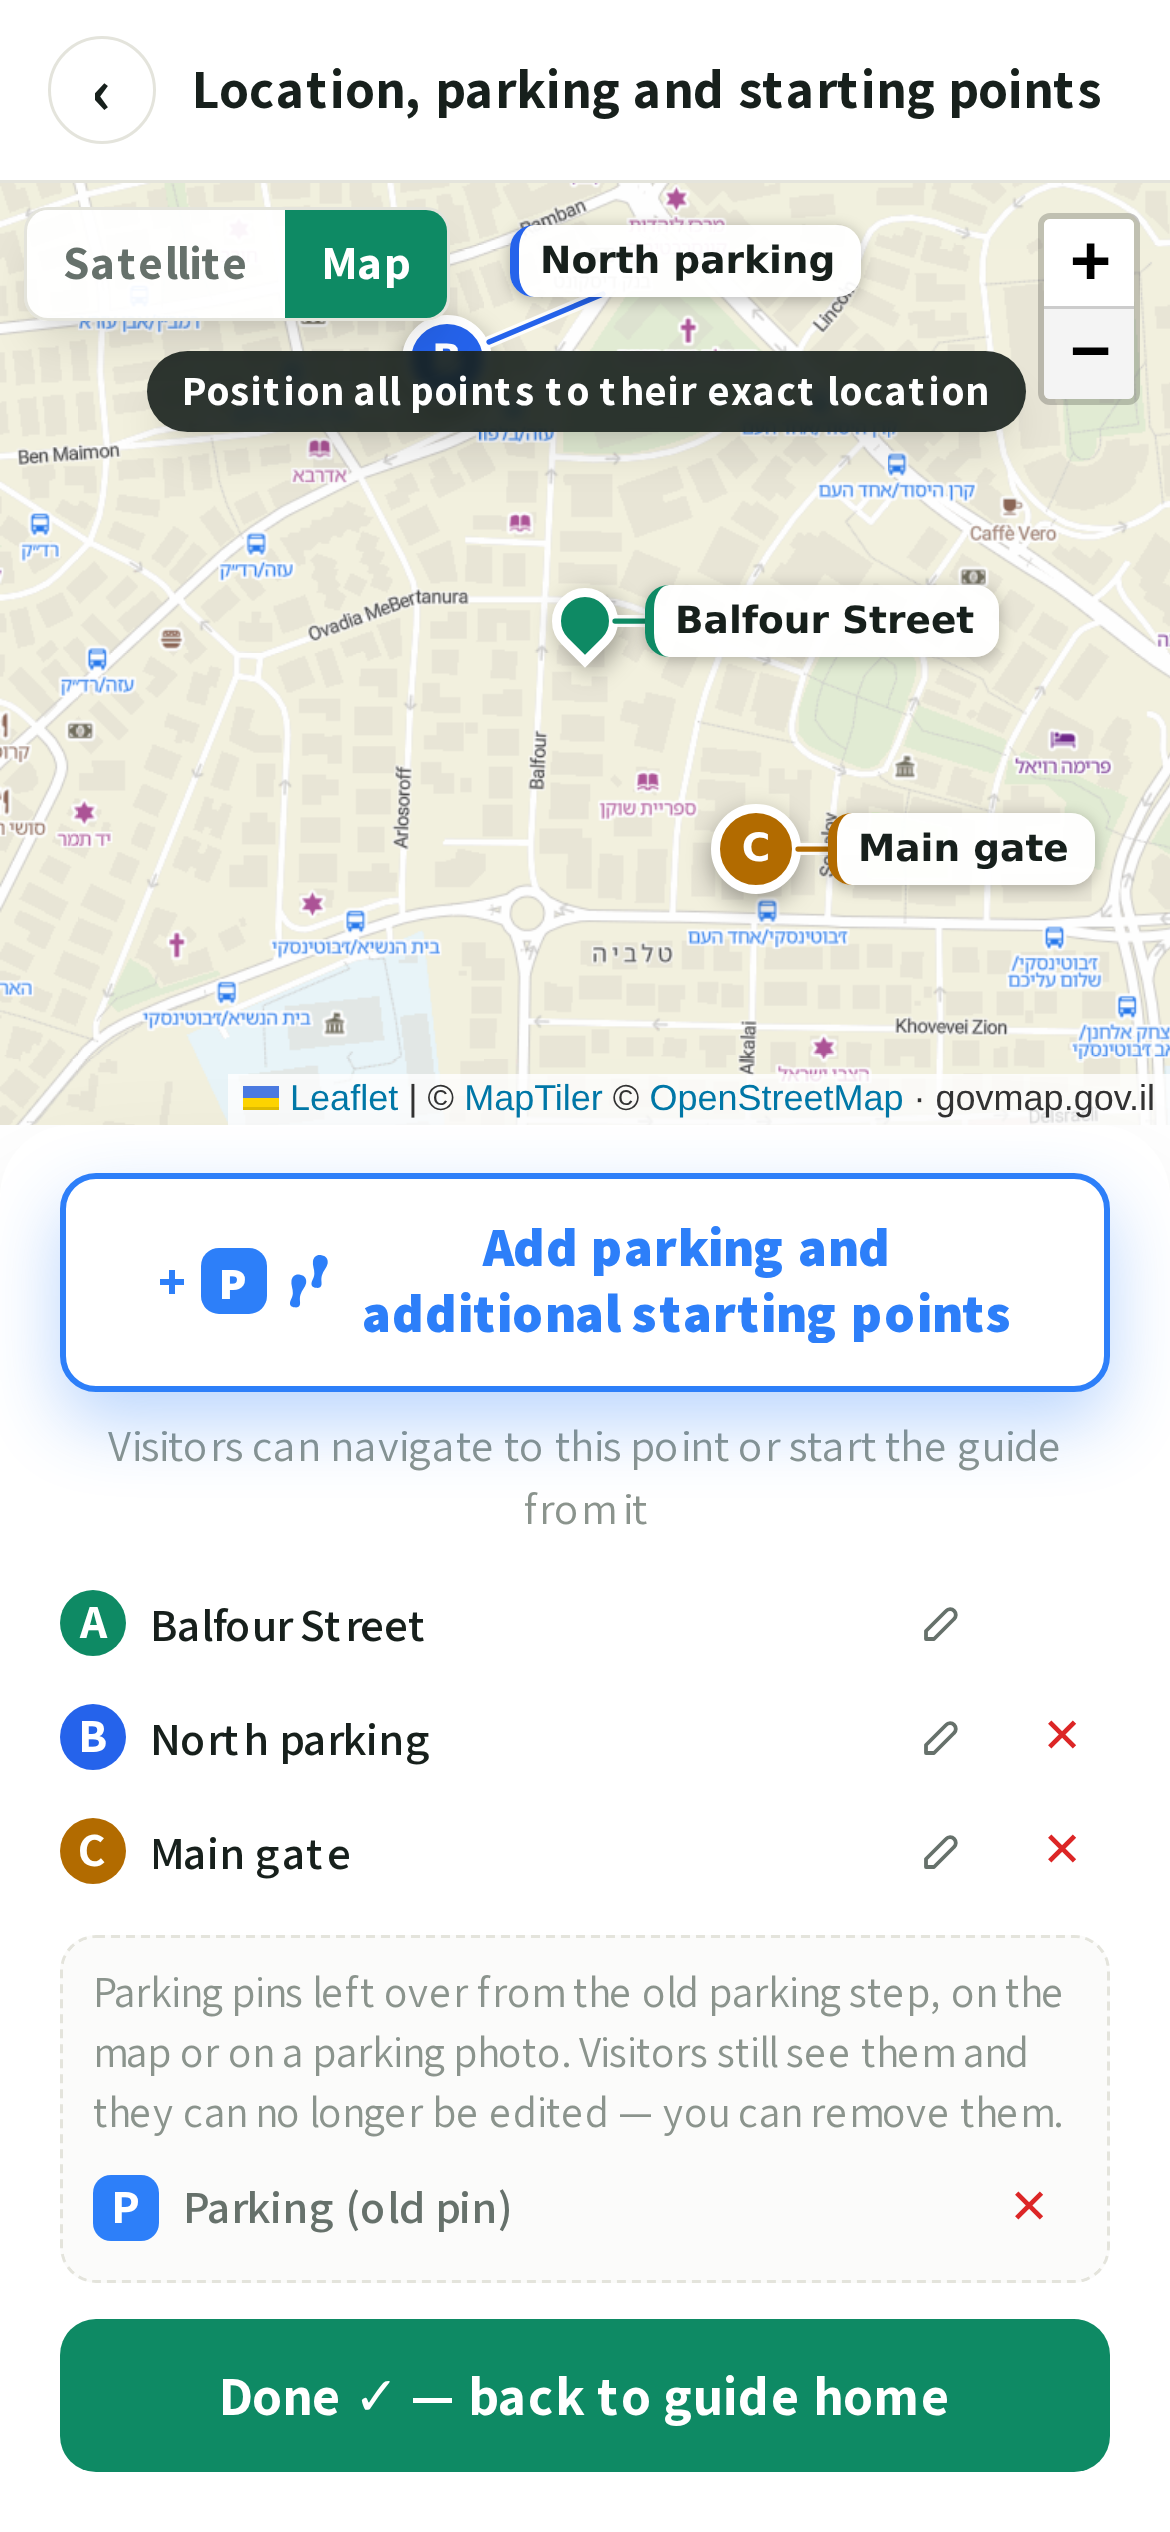
- 1On the first step (name & address), tap the map. It opens full screen ("Location, parking and starting points") and it is where a way in is created now, right beside the address pin.
- 2Tap + P Add parking and additional starting points, type a name ("North parking", "Main gate") and tap 👣 Entrance. The point drops onto the map straight away; drag it if it needs nudging. Naming and placing happen together, so a way in always has a real position. Add up to four points this way, entrances and 🅿️ parking spots together. Each point's name is written beside its pin on the map (on the full-screen map while you place them, on the small map on the name & address step, and on the visitor's own map) so you never have to work out which badge is which. Where two points sit close together one name steps aside, still joined back to its own pin by a thin line. Every point is listed under the map, and the ✎ on its row renames it: the fix for a name typed in a hurry, without losing the pin's position or the photos tagged to it. The same ✎ switches the point between 🅿️ parking and an entrance, so a lot you first placed as a gate is one tap from being right.
- 3On the photos step your list is drawn as the walk itself. Drag a photo by its ⠿ handle into a way in's group to say it belongs to that way in; leave it in Everyone continues here for the common part of the walk.
What your visitor sees
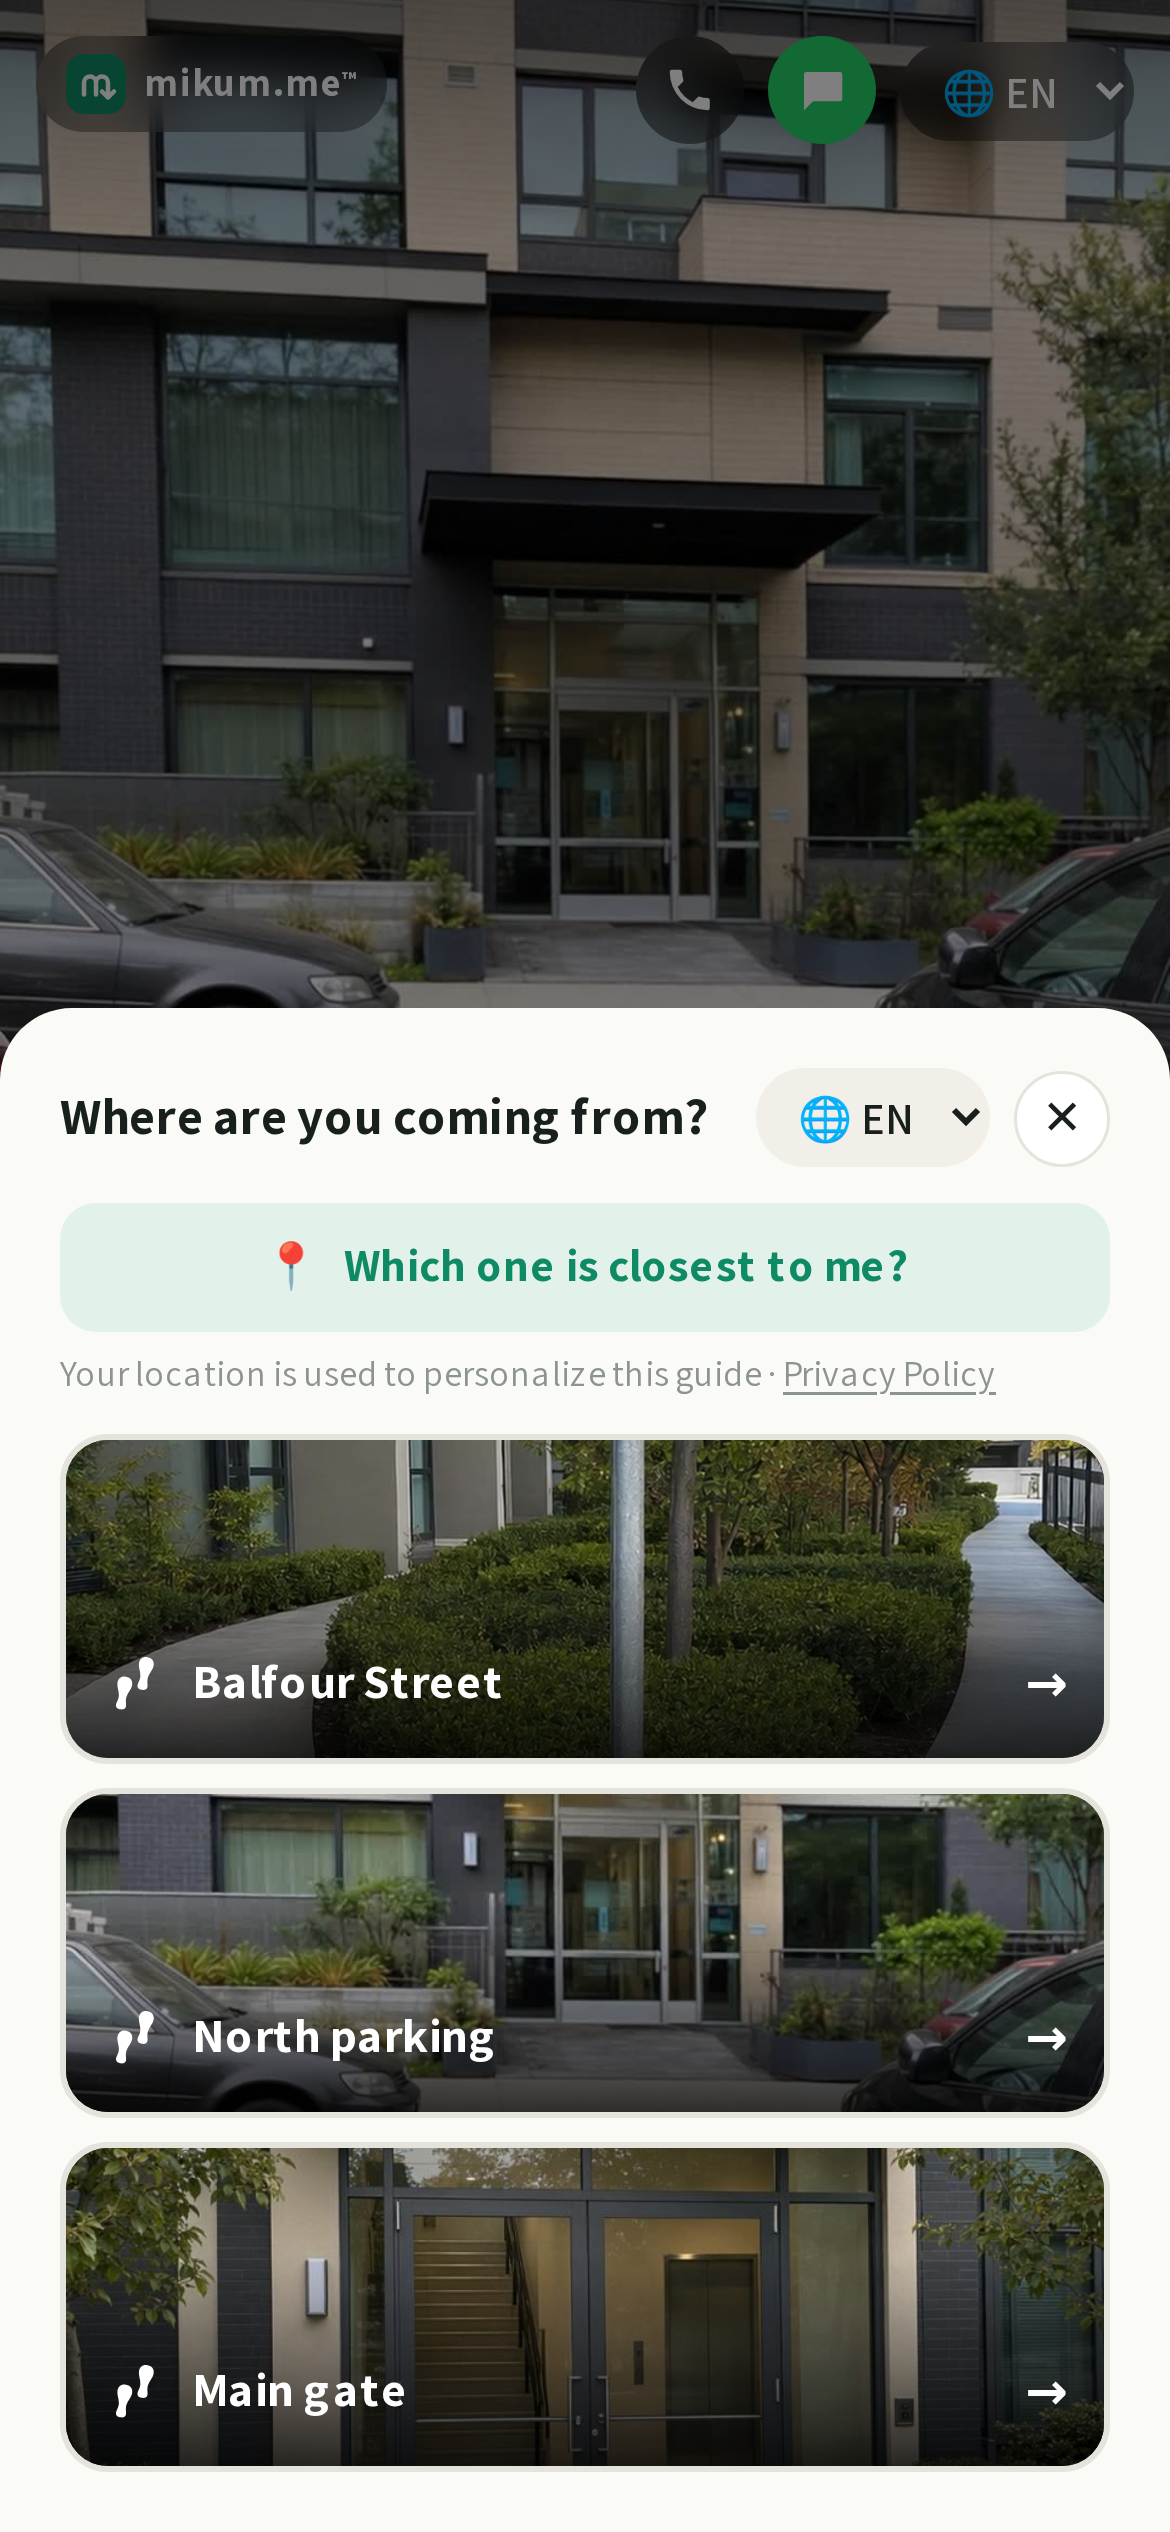
Tapping See how to get in shows a split screen: each way in's first photo, with its name. The photos are shown plain here, with no arrows or captions, because at this point your visitor is recognising a place, not following a route.
- If their phone already shares its location with us, they are not asked anything: the ways in arrive already sorted, nearest one at the top, with a Closest to you note on that first photo.
- If it does not, they see a Which one is closest to me? button instead. Tapping it shares their location once, and the list sorts itself the same way.
- It is only ever a suggestion: they can tap any photo by name, and that way in's walk starts straight away.
- Each photo carries that way in's own mark: a blue P for a parking spot, a pair of footprints for an entrance, the same marks you placed on the map, so a visitor still sitting in the car can tell the lots from the doors at a glance.
- If you skip the map, the picker still works: it just keeps the order you named them in.
Reading the photos list
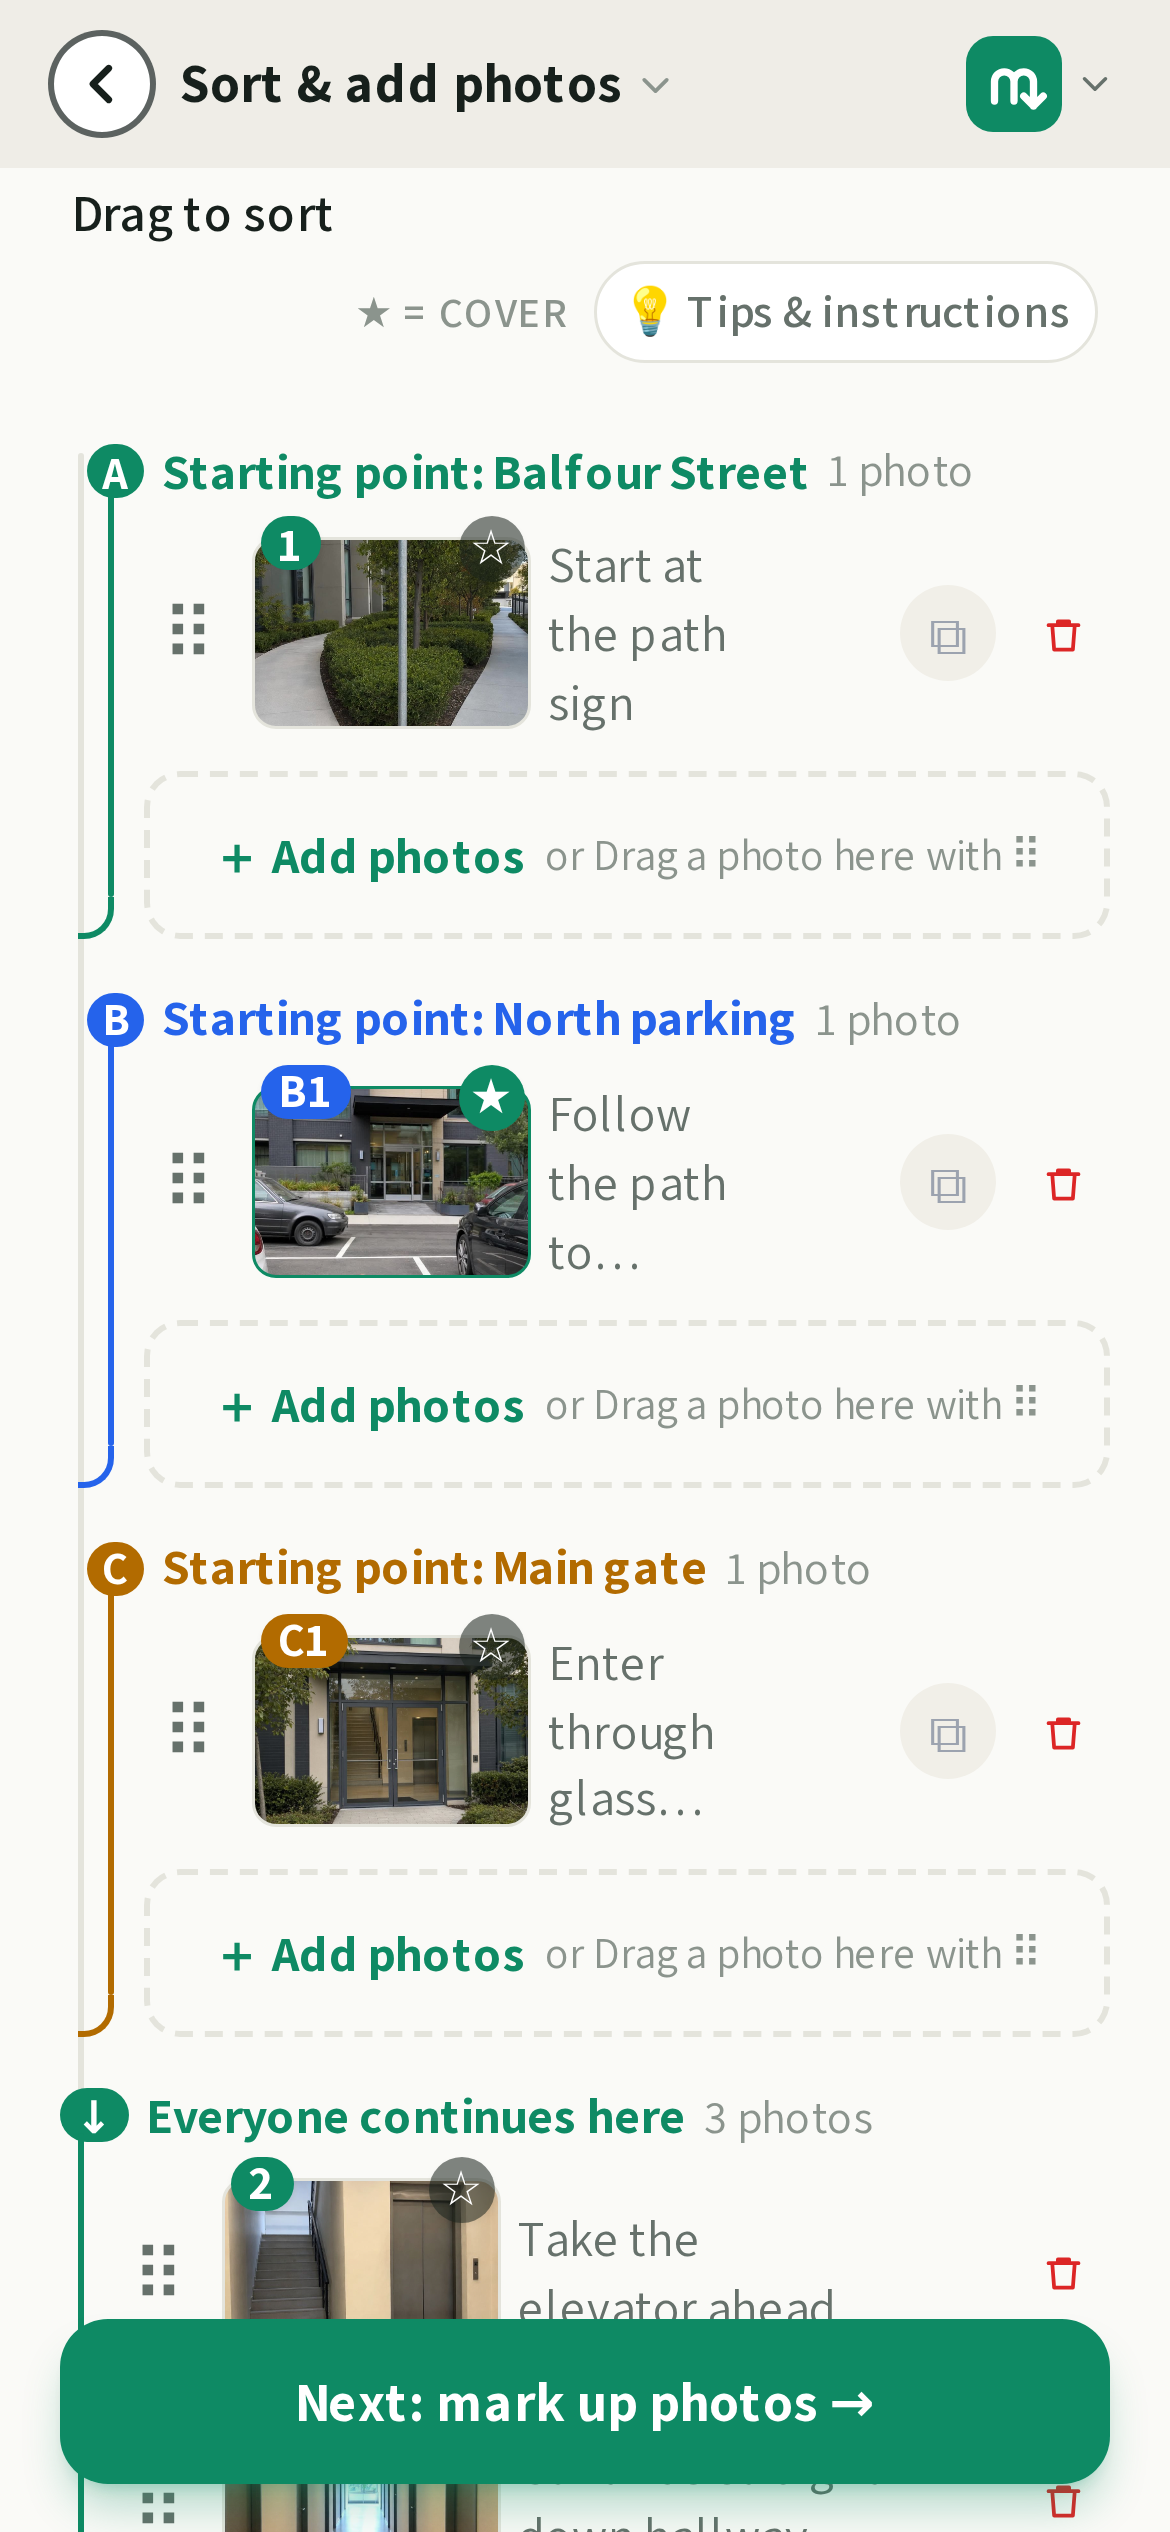
Each way in is a short branch at the top with its own colour, and the branches merge into the shared walk below.
- Photos in a branch are numbered A1, A2 · B1, B2; the shared photos carry on from the longest branch: 3, 4, 5 …
- Dragging does both jobs: up and down inside a group reorders it, into another group moves the photo onto that way in. The group under your finger lights up so you can see where it will land.
- A way in with no photos yet shows a dashed box: drop a photo in there to start its branch.
- + Add photos boxes do the adding: one at the end of every group, including Everyone continues here at the foot of the list. Tap the box where the photo belongs and choose Take or choose a photo or A video; there are no add-photos buttons above or below the list any more, and nothing to drag back up.
Sharing one photo between two ways in
Some photos belong to more than one way in: the same lobby door, say, whichever way someone arrives. Link it instead of uploading it twice:
- Tap the ⧉ button on a photo row to open Show this photo in…, and tick every way in that should show it. It lands at the end of that branch: drag it into place like any other photo. Unticking a box takes it out of that way in again.
- The extra copy carries a small ⧉ from A3 chip naming where the photo really lives, and the photo's own row carries ⧉ also B2. Tap either chip to jump between them.
- Dragging the photo's own row is unchanged: dropped on another way in it *moves* there, landing exactly where you let go. Sharing is the ⧉ button's job.
- One kind of drop asks first: let the photo go on a way in it is already shared with (or on "Everyone continues here") and mikum checks before moving it, because that move merges the two rows into one and the ⧉ link goes away. Choose *Cancel and keep the link* and the list goes straight back to how it was.
- The extra copy can only be dragged up and down inside its own way in. Drag it over a different one and that way in fills with red stripes: it can't be dropped there, and the copy stays where it was. To put the photo on one more way in, use ⧉ on the photo's own row.
- Caption and markup are shared between the copies: edit either one and both update, since it is really one photo. Deleting it asks whether to remove it from just this way in, or everywhere.
- ⇅ Reverse photo order on a guide with more than one way in asks first, then flips the photos *inside* each way in: nothing jumps from one way in to another.
Good to know
- With one way in (or none), nothing changes: no groups for you, no question for your visitor.
- A way in with no photos tagged to it is skipped, so a half-finished setup never shows an empty branch.
- Delete a way in and its photos simply become shared again: no photos are lost.
- Placing every way in on the map is what makes the sorting work, so it is worth the extra minute.
- The first photo you put in a branch is the one your visitor sees on the picker, so make it a photo of the place itself: the lot, the gate, not a close-up of a sign.
Parking and your ways in, on one map
Both are start points, both are placed on the same map on the first step, and both are on the visitor's Navigate screen: a blue P for each parking spot, a lettered badge for each way in. Tapping a way in's badge gives directions to it, and when the visitor comes back, the guide opens on that way in's first photo instead of asking "where are you coming from?". Driving there already answered it. Choose an app for a point that is *not* tied to a way in (the destination itself, say) and the picker comes up right then instead, so the question is answered before the drive rather than after it.
Your main starting point
The green dot you dragged into place on the map is a starting point too: the main one. While it is the only way in it stays nameless, because there is nothing to tell it apart from. Add a second start point (an entrance or a parking spot) and it appears as the first row of the list under the map: named after your street to begin with, with a ✎ beside it to call it whatever your visitors call it. It carries the letter A, so the points you add yourself start at B, and it has no ✕: it is the address of the place, so it can't be removed. From that moment its name shows on the map too, and it gets its own group at the top of the photos list.
- The first photo of the guide belongs in that group: it is the shot someone arriving at the address itself needs. Everything after it goes in Everyone continues here, so it is shown once and every visitor sees it whichever way they came.
- A new guide fills it in for you: the first photo you add lands there, the rest carry on below. Drag it out with ⠿ if the walk really does begin at the gate; an empty main group is a perfectly good answer.
- Your visitor is only asked where are you coming from? when a second start point actually has photos on it. One starting point, one walk: the guide opens straight into it, exactly as before.
Adding photos straight to a starting point
Every group in the photos list ends in a dashed + Add photos card: a starting point with no photos yet, one that already has some, and the shared walk at the foot of the list. Tap the card where the photo belongs and choose Take or choose a photo or A video: what you add is put in that group automatically, so you don't have to add it at the end of the walk and drag it back up.
- ⠿ still works. Drag any photo into the card (or out of the group again) whenever you want to move it after the fact.
- Empty is still fine. A parking spot or a gate often needs no photo of its own; the card is an invitation, not something you have to answer.
- Photos added this way go straight to the group's own numbering (B1, B2 …), and everything shared by every visitor stays in Everyone continues here.
Last updated Aug 23, 2026